If you’ve spent any time exploring the deserts of the American Southwest or Mexico’s Baja Peninsula, you’ve probably seen towering columnar cacti that look remarkably similar. The two most famous are the Saguaro and the Cardón.
At first glance, these desert giants appear nearly identical. Both grow tall, develop arms, and dominate the desert skyline. But look closer and you’ll find they are different species with unique characteristics, habitats, and growth habits.
Let’s explore what makes these iconic cacti both similar—and very different.
The Saguaro Cactus
The Saguaro is one of the most recognizable symbols of the American Southwest.
Native almost exclusively to the Sonoran Desert, these iconic plants grow primarily in Arizona, with small populations in California and Mexico.
Key Characteristics
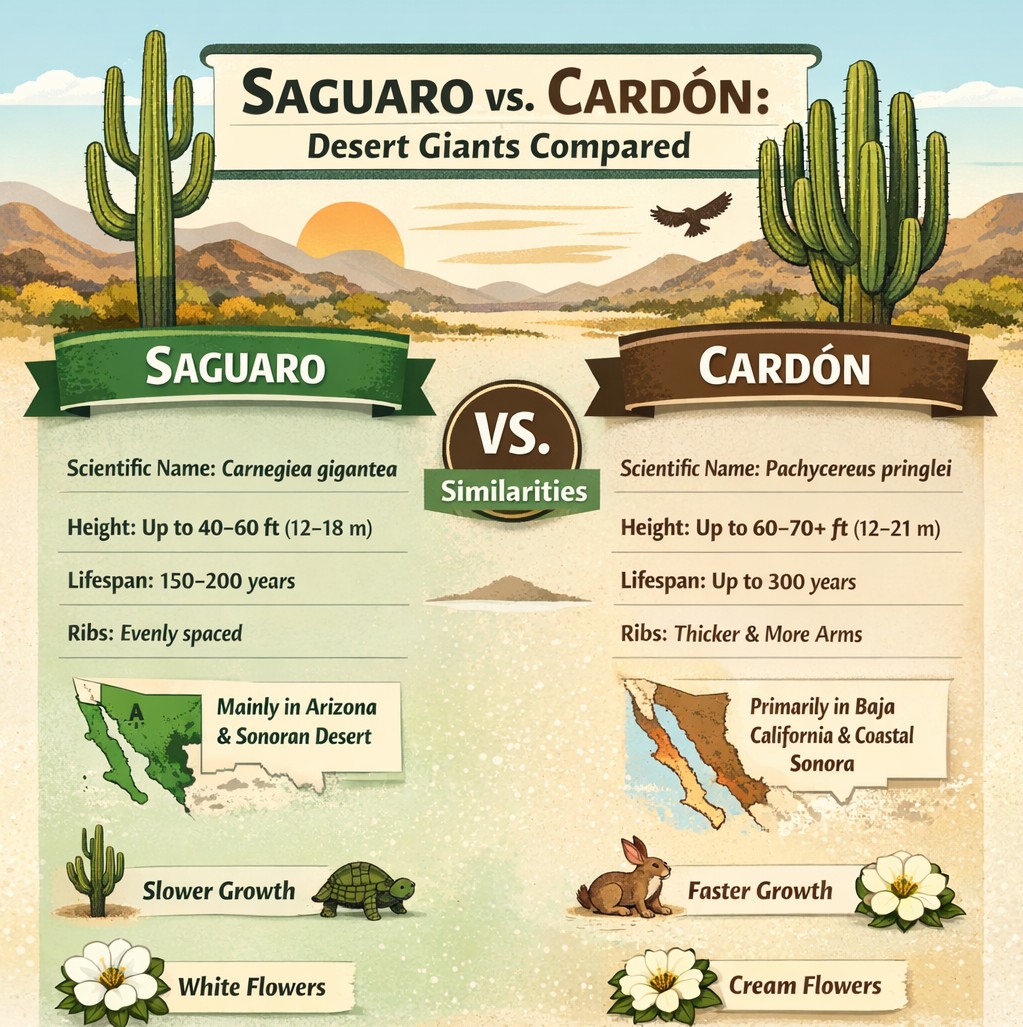
- Scientific Name: Carnegiea gigantea
- Average Height: 40–60 feet (12–18 m)
- Maximum Age: 150–200 years
- Weight: Up to 4–6 tons when full of water
- Arms: Usually grow after 50–70 years
- Flowers: White blooms that open at night
The saguaro is protected within areas like Saguaro National Park, where forests of these cacti create one of the most famous desert landscapes in the world.
These plants are incredibly slow growing. A saguaro may be only a few inches tall after its first decade.
The Cardón Cactus
The Cardón cactus is the largest cactus species on Earth.
While it looks very similar to the saguaro, the cardón primarily grows farther south on the Baja California Peninsula and the mainland coast of Sonora.
Key Characteristics
- Scientific Name: Pachycereus pringlei
- Average Height: 40–70 feet (12–21 m)
- Maximum Height: Over 60 feet commonly, occasionally taller
- Growth Rate: Faster than saguaro
- Structure: Often thicker trunk and more arms
- Flowers: Cream-colored blossoms
Cardón cacti frequently grow in dense stands, sometimes called “cardón forests,” which can make parts of Baja feel like a prehistoric landscape.
Similarities Between Saguaro and Cardón
Despite being different species, these cacti share many characteristics because they evolved in similar desert environments.
Shared Traits
🌵 Columnar shape with vertical ribs
🌵 Water storage tissue to survive long droughts
🌵 Night-blooming flowers pollinated by bats and insects
🌵 Arms that grow upward from the main trunk
🌵 Extremely long lifespans
Both species are keystone plants in the desert ecosystem. Birds, insects, and mammals rely on them for food, shade, and nesting sites.
For example, birds such as the Gila Woodpecker carve holes into saguaros to create nests, which later become homes for other desert species.
Key Differences
While they look alike, there are several easy ways to tell them apart.
1. Geographic Range
Saguaro
- Found mainly in Arizona and parts of the Sonoran Desert.
Cardón
- Dominates the deserts of Baja California and coastal Sonora.
If you’re traveling through Baja, you are almost certainly seeing cardón rather than saguaro.
2. Size and Growth
Cardón cacti typically grow:
- Taller
- Thicker
- Faster
A cardón can develop arms earlier in its life than a saguaro.
3. Trunk and Rib Structure
- Saguaros usually have more evenly spaced ribs and smoother trunks.
- Cardóns often appear thicker and more heavily branched, sometimes with many arms emerging lower on the trunk.
4. Root System
Both species have shallow root systems designed to capture rain quickly.
However:
- Cardón roots can spread even wider due to their larger size and faster growth.
Why They Look So Similar
Both species evolved in the Sonoran Desert, one of the most biologically diverse deserts on Earth.
Because they adapted to nearly identical environmental pressures—intense heat, limited rainfall, and long drought periods—they developed similar shapes and survival strategies. This phenomenon is known in biology as convergent evolution.
Seeing Them in the Wild
If your travels take you through Arizona, the iconic silhouette of the saguaro will define the desert landscape.
Cross the border into Baja California, however, and the towering cardón becomes the dominant giant.
For travelers and RV adventurers exploring the Southwest and Baja, spotting the subtle differences between these two desert giants becomes part of the fun.
Final Thoughts
The Saguaro and the Cardón are among the most impressive plants in North America.
Though they share a similar appearance, their differences tell the story of how desert life adapts to geography, climate, and time. Whether standing alone on an Arizona hillside or clustered across a Baja valley, these towering cacti remind us just how resilient life in the desert can be.
Day 3095