RV Power Inverters Explained: How They Work, Types, and the Pros & Cons of Each
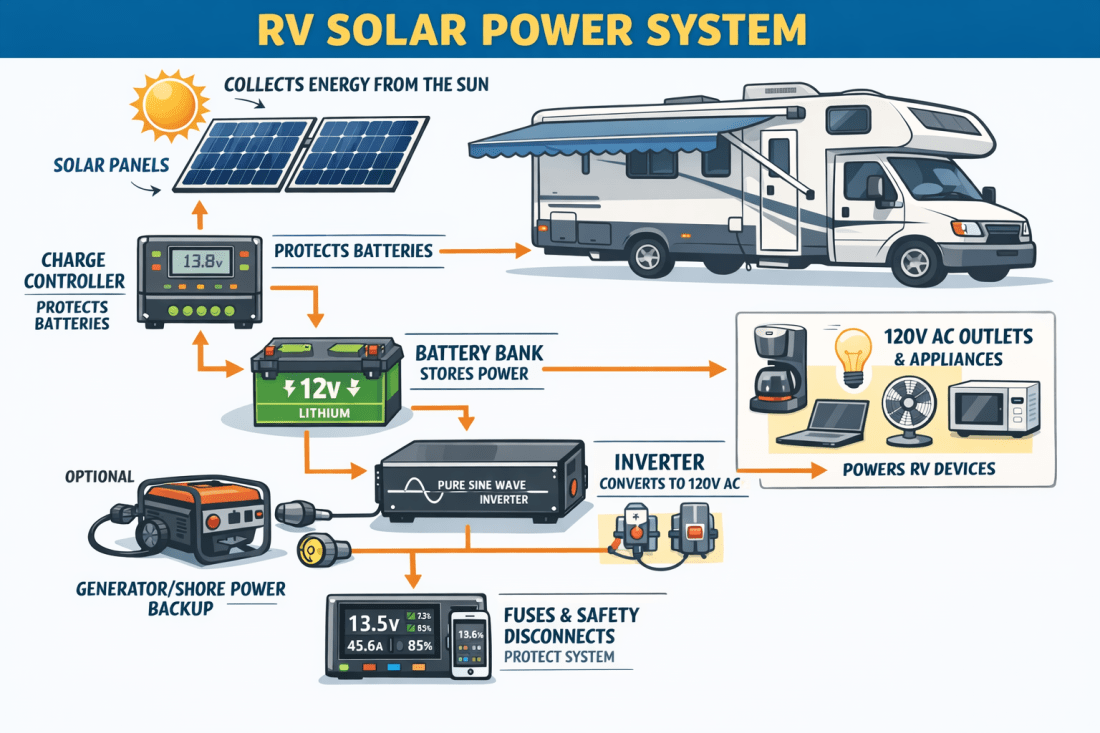
An RV power inverter is what makes solar-stored energy usable for everyday life. Your batteries store power as DC electricity, but most household appliances require AC power. The inverter is the device that bridges that gap.
If solar panels are the producers and batteries are the storage, the inverter is the translator that allows you to use power just like you would at home.
This guide explains:
- What an RV inverter does
- How it works internally
- The main types of RV inverters
- The pros and cons of each style
- How to choose the right inverter for your RV
What Is an RV Power Inverter?
An inverter converts direct current (DC) electricity from your batteries into alternating current (AC) electricity that powers:
- Wall outlets
- Microwaves
- TVs
- Coffee makers
- Computers and chargers
Without an inverter, your solar system could only power 12-volt devices.
How an RV Inverter Works (Simple Explanation)
Inside an inverter:
- DC power enters from the battery bank
- Electronic switches rapidly change the direction of current
- This creates an AC-like waveform
- Voltage is boosted to household levels (120V or 240V)
- Power flows to outlets and appliances
Modern inverters are highly efficient and can convert 85–95% of battery energy into usable AC power.
Types of RV Power Inverters
There are three main inverter styles used in RV systems:
- Modified Sine Wave Inverters
- Pure Sine Wave Inverters
- Inverter/Chargers (Combination Units)
1. Modified Sine Wave Inverters
What They Are
Modified sine wave inverters create a simplified, stepped approximation of AC power.
Pros
- Lower upfront cost
- Simple electronics
- Works for basic loads
- Widely available
Cons
- Not compatible with many modern electronics
- Causes buzzing in motors and audio devices
- Less efficient
- Can overheat sensitive equipment
- Shortens appliance lifespan
Best Use Case
- Basic systems
- Powering simple resistive loads (lights, heaters)
- Temporary or emergency use
Beginner Note:
Most RVers are better off avoiding modified sine wave inverters today.
2. Pure Sine Wave Inverters
What They Are
Pure sine wave inverters produce AC power that closely matches utility grid power.
Pros
- Safe for all electronics
- Efficient operation
- Quiet motor performance
- Longer appliance lifespan
- Required for modern RVs
Cons
- Higher cost than modified sine wave
- More complex electronics
Best Use Case
- Full-time RVing
- Solar-powered systems
- Running microwaves, CPAPs, laptops, TVs
- Lithium battery systems
Industry Standard:
Pure sine wave inverters are now considered essential for RV solar systems.
3. Inverter/Chargers (All-in-One Units)
What They Are
An inverter/charger combines:
- A pure sine wave inverter
- A high-capacity battery charger
- Automatic power switching
How They Work
- When plugged into shore power or a generator → charges batteries
- When unplugged → switches to inverter mode instantly
Pros
- Seamless power switching
- Fast battery charging
- Cleaner wiring
- Ideal for full-time RVs
- Often includes monitoring and protection features
Cons
- Higher cost
- More complex installation
- Larger physical size
Best Use Case
- Full-time RVers
- High-capacity battery systems
- Winter RVing with generator backup
Inverter Size Explained (Watts Matter)
Inverters are rated by continuous wattage and surge wattage.
Common RV Inverter Sizes
- 1000W – Small systems, light loads
- 2000W – Most common RV size
- 3000W – Large systems, high-draw appliances
Rule of Thumb
Choose an inverter that can handle:
- Your largest appliance
- Multiple loads at once
- Startup surges
Pro & Con Comparison Table
| Feature | Modified Sine | Pure Sine | Inverter/Charger |
|---|---|---|---|
| Cost | Low | Medium | High |
| Power Quality | Poor | Excellent | Excellent |
| Appliance Safety | Limited | Full | Full |
| Efficiency | Lower | Higher | Highest |
| Complexity | Low | Medium | High |
| Best For | Simple loads | Most RVs | Full-time RVs |
Battery Impact and Efficiency
Lead-Acid Batteries
- Sensitive to inverter inefficiency
- Voltage drop affects performance
- Larger banks required
Lithium Batteries
- Ideal for inverters
- Stable voltage
- Higher surge capacity
- Faster recovery
Standby Power Draw (Inverter Idle Use)
Inverters consume power even when nothing is plugged in.
- Small inverters: 10–20 watts
- Large inverter/chargers: 20–50 watts
Tip:
Turn the inverter off when not in use to save battery power.
Common Inverter Mistakes
- Buying too small an inverter
- Ignoring surge ratings
- Using modified sine wave with sensitive electronics
- Mounting too far from batteries
- Not accounting for standby draw
Choosing the Right RV Inverter
Weekend RVers
- 1000–2000W pure sine inverter
Boondockers
- 2000–3000W pure sine inverter
Full-Time RVers
- Inverter/charger combo
- 2000–3000W range
Final Thoughts: The Inverter Is the Comfort Component
Your inverter determines what your RV can do off-grid. A properly sized, high-quality inverter makes solar power feel effortless and home-like.
For most modern RV solar systems:
A pure sine wave inverter is not optional — it’s essential.
Day 3090


